Windows 95/98 - Dial-Up Networking |
Here are instructions that will aid you to properly configure your computer's parameters in order to successfully connect to the Internet via Kravin Systems. This section is dedicated to all those who have Windows 95 or 98.
SECTION I - INSTALLING "DIAL-UP NETWORKING"
If "Dial-Up Networking" is already installed, go directly to Section II. "Dial-Up Networking Setup".
Step 1 - Click on the "Start" button and go in "Settings", then in "Control Panel".
Step 2 - Double Click on the "Add/Remove Programs" portion of the "Control Panel".
Step 3 - Click on the tab marked "Windows Setup". Click on the component called "Communications" and then click on the button marked "Details..."
Step 4 - If Dial-Up Networking has not been checked please check the box just to the left of the component "Dial-Up Networking". If it is already checked then press "Cancel" both in the "Details..." window and in the "Add/Remove Programs" window and skip step 5.
Step 5 - After you select "Dial-Up Networking" then click on OK on the "Details..." window and click OK once again on the "Add/Remove Programs" window. You will then be prompted to insert the necessary disk(s) so that Windows 95/98 can install these components. You will need to have Windows 95/98 restart itself for these changes to take effect.
SECTION II - "DIAL-UP NETWORKING SETUP"
First, go on your desktop and double click on the My Computer icon.
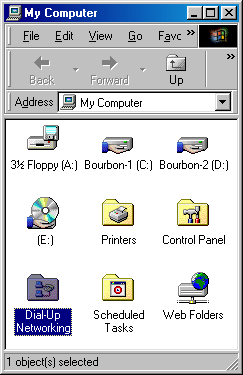
- Next, double click on Dial-up networking. Once you've reached this level, you should see an icon named Make a new connection -- double click on it.
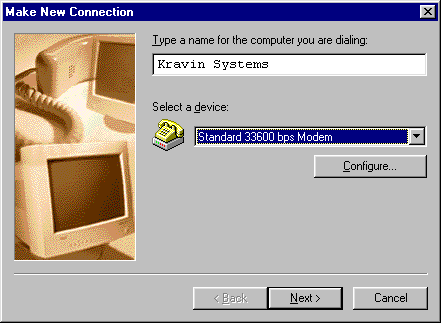
A new window should appear, requesting you to name the connection you will be setting up. Type in "Kravin Systems" You should also see the brand name of your modem at the bottom of the window. Press on Next when done.
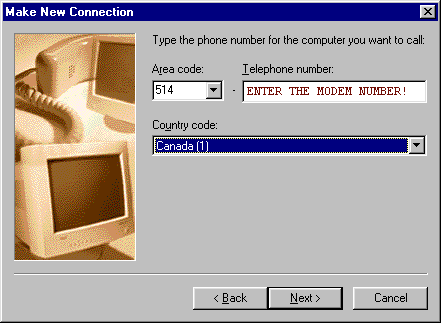
Area Code: 514 (for our subscribers outside of Montreal)
* Please call us for our modem phone numerbs.
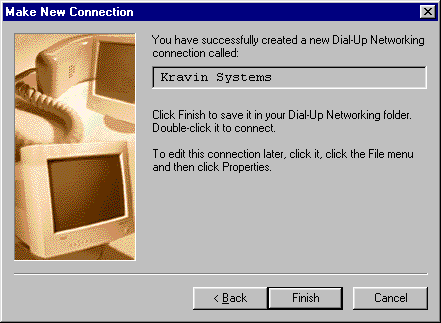
Click on Next and then on Finish to apply all the modifications.
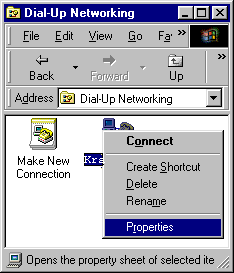
- You should find a new icon in the Dial-Up Networking window, which is that of Kravin Systems. Click once on the icon using your right mouse button. This should open small menu as displayed on the photograph below. Now, select Properties.
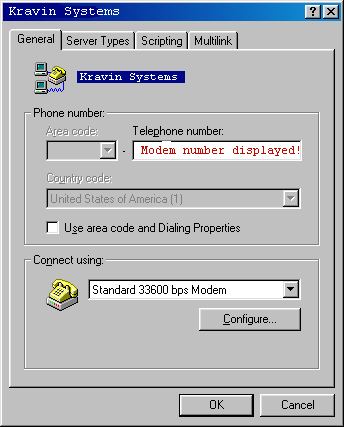
- A new menu should appear including four (4) tabs. In the General section, you should see the telephone number entered above with (514) for clients from outside 514 area. If you have Call Waiting, you can add *70, (including the comma) in front of the number for the connection. This will disactivate your Call Waiting function and minimize your chances of getting disconnected if somebody is attempting to call you.
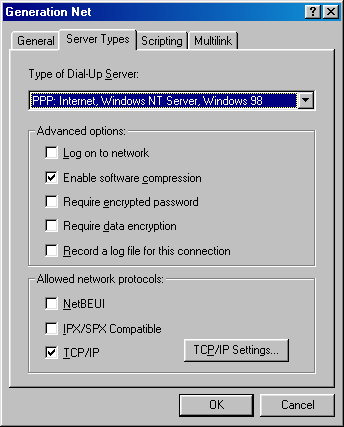
- Click on Server Types and keep only these options of notched: Enable software compression -and- TCP/IP.
 -
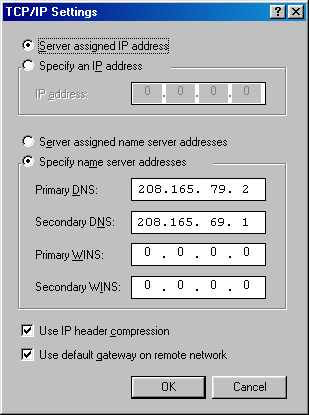
Leave Server assigned IP address and Specify name server adresses seleted. Put these numbers in the following section:
Primary DNS: 208.165.79.2
Secondary DNS: 208.165.69.1
Leave the primary and secondary WINS to 0.0.0.0 and select Use IP header compression and Us default gateway on remote network. Then press on OK.
THE CONNECTION
- You need to have the special software installed on your machine in order to get conneted. If you are currently connected and having problems viewing web pages, it's probably because you entered an incorrect DNS in your connection parameters. All the changes made to your configuration will only take effect at the time of your next connection.
Therefore disconnect and redial.
As well Windows sometimes acts a liitle pecular and it may be required for you to shut down and restart your machine.
|
